Woocommerce
Orders
Finding Orders
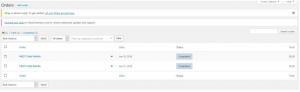
Orders can be found by going to Dashboard>WooCommerce>Orders your screen should look like this by navigating through these options, or similar. Non admins will be lacking the ability to edit and create orders along with the corresponding options.
Creating Orders
Creating a new order from scratch is a simple straightforward process. Starting from the Orders screen, click Add Order.

This will bring up a blank order form which needs to be populated with , 1. the customer’s account name, 2. the product or service, 3. any coupons that apply to the specific order.
Setting a customer’s Account name-
On the order screen under the Status listbox you can select a customer’s account. Clicking on said listbox will bring up a search input. You can either input an Account Name or the name of the customer and it will list all customer with results closest matching your desired customer.
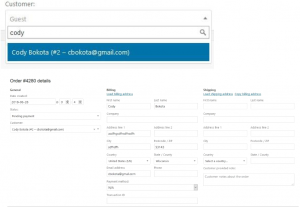
ImageSelect the desired user and all account information will auto populate based on a customer’s saved information.
Adding a Product or Service to the Order-
On the order screen under the customer’s account information, you can add products or services.
![]()
Clicking on Add Item(s) will bring up some new context options on the right side of the item context. Clicking on Add product(s) will bring up a search box, just like with finding a customer’s account information, type in a few characters or the entire name of a product or service. This will list all products/services closest matching the inputted characters.
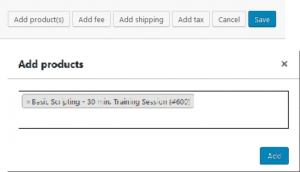
After selecting your desired product it will be added to the context box, at this point you can keep adding products by searching, or choose Add to set the product to the order.
Adding a Coupon to the Order-
On the order screen under the customer’s account information, you have the option of applying a coupon code to the order. Click on Apply Coupon(s) and input the exact name/code of the desired coupon, this will apply the discounts to the order. (Warning: Clicking recalculate after applying a coupon will remove any apply discounts completely, thus causing you to remove the coupon code and reapply it to the order.)
Do I need to generate a software key for DLC or program Orders?-
No, software keys are automatically generated when adding the DLC/software product.
Order Notes-
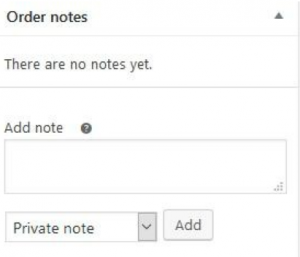
Order notes are simply notes that can be shared with staff or anyone able to view notes. A useful feature for keeping track of order specifics or any small bits of information you need to keep track of for the order. After typing your note, selecting Private or even sending a direct note to the customer, and clicking Add your notes will be applied.
Finishing the Order-
When all required information is entered into the order, you can save all of the information by clicking the Create button on the right side of the screen just above the order notes section.

Refunding Orders
Refunds are handled internally by Woocommerce. If there is ever a situation whee a refund must be processed manually it should only be done by an Admin. Refunds should then be processed through the payment gateway used by the customer. Direct steps to refund an order are as follows:
0 Go to: WooCommerce > Orders
0 Select the order you wish to refund.
0 Click the grey Refund button to start.
0 Specify the quantity of the product(s) to be refunded in the text box(es) that appear for each line item. The refund amount will automatically adjust based on the products refunded. If inventory levels are not managed, you can also simply enter the Refund amount, without adjusting the product quantity. If the quantities of items are not set when issuing a refund then the order is not marked as refunded and the email that is sent will say “partial refund.”
0 Add refund notes, if desired.
0 Click Refund $X via [Your Gateway]
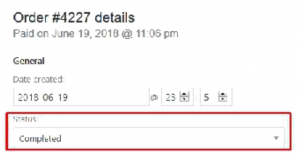
To set an order status to Refunded, open the desired order by going to Dashboard>WooCommerce>Orders>Chosen Order and under Status set it to Refunded.
Service Appointments
Finding Appointments
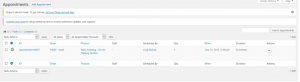
Appointments can be found by going to Dashboard>Appointments>All Appointments your screen should look like this by navigating through these options, or similar. Non admins will be lacking the ability to edit and create appointments along with the corresponding options.
Creating Appointments
Creating a new appointment from scratch is a simple straightforward process. Starting from the All Appointments screen, click Add Appointment.
![]()
This will bring up a blank appointment form which needs to be populated with , 1. the customer’s account name, 2. the product or service, and 3. the method for creating the Appointment.
Create a new corresponding order for this new appointment.-
This option will create an entirely new order that is linked to this service appointment. This is best used if manually creating an appointment for a customer.
Assign this appointment to an existing order with this ID:-
This option will add the new service to an existing order. The customer is charged for the new service with this option.
Don’t create an order for this appointment. –
This option will create the new appointment, but will not add a new order. This is ideally used for rescheduling an appointment that has already been paid for.
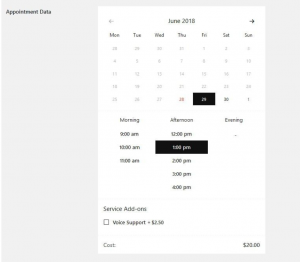
Select a date and time. –
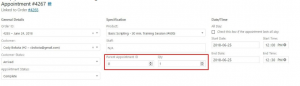
On the next screen you have the ability to set the date of the new appointment along with the time.
Review the new Appointment. –
You can view all the newly created appointment information by navigating to Dashboard>Appointments>All Appointments>Your created Appointment. You should be redirected to the new appointment. All of the informations in the new appoint should be generated with all information you input in the previous parts.
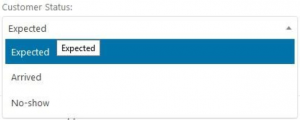
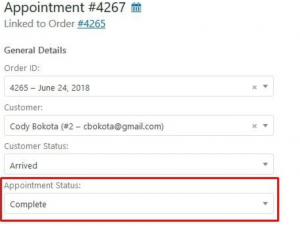
Confirming Appointments when your session starts
Confirming appointments is a very simple process. In the appointment screen, change the customer status to Arrived.
Rescheduling Appointments
Create a new Appointment as outlined above. Fill in customer information and choose Don’t create an order for this appointment. On the next screen pick the calendar date and time for the rescheduled appointment along with filling out any necessary information from the initial order.
Setting a Parent ID for the new Appointment. –
Setting a parent ID for the new appointment is used for linking a rescheduled appointment to the initial appointment. This should contain the Appointment ID of the appointment that is being rescheduled.
How to handle cancellations
Cancellations are handled internally by Woocommerce. If a customer cancels within 24 hours the cancellation must be processed by an admin manually (incurring a 10% processing fee) then following the same steps outlined for Orders to process a refund if applicable.
To set an appointment status to Cancelled, open the desired order by going to Dashboard>Appointments>All Appointments>Chosen Appointment and under Status set it to cancelled.
Editing Sales and Scheduling Sales
Sales are handled on a per product basis. To set up sales or promotions for purchases you must (from the Back End Dashboard) navigate to Products, found on the left navigation bar and click. This should take you to the Products listing where all existing products can be viewed and edited.
Regular Price- The regular listed price of a product
Sale Price- The new sale price that is listed and processed when a sale is scheduled. If no sale period is scheduled this price display by default as an “ongoing sale”.
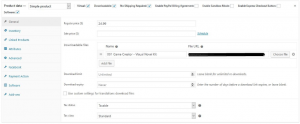
Scheduling a Sale
To Schedule a Sale click the Schedule link to the right of the Sale Price text box. This will expand the Sale Price Dates Start and End text boxes
To set a start date, click on the “FROM… YYY-MM-DD” text box. A small calendar will expand and you can select your desired date. Upon selecting the date the text box will be populated with your selection from the expanded calendar.
To set an end date, click on the “TO… YYY-MM-DD” text box. A small calendar will expand and you can select your desired date. Upon selecting the date the text box will be populated with your selection from the expanded calendar.
Sales run from your start date to the start of your end date.
![]()
Affected Areas of Setting a Sale
Product Icon- A Sale! Box is added to the top right of the Icon in store. Prices change by striking through the old price and listing the new sale price to the right.
Product Page- Each product will list changes by striking through the old price and listing the new sale price to the right
Buttons- There are 4 dynamic Purchase Now buttons that change with sale prices. 2 on https://001gamecreator.com/ , 1 on https://001gamecreator.com/screenshots/ , and 1 on https://001gamecreator.com/001-game-creator-crack/. These should require no additional actions and update automatically.
The final process to setting a sale is to clear the page cache.
This can be done from the back end Dashboard by navigating to Performance in the left navigation bar, then selecting Page Cache in the extended listings. On this page simply click the “empty cache” button. (all options are preset). There we go, everything is set.
![]()
Affected Areas of Setting a Sale
To end a sale, navigate to each product page set and clear the Sale Price text box. Then press the
cancel link on the right side of the “Sale price dates” text boxes.
![]()
Dynamic Button Coding
Below is listed the full coding for the dynamic button located in the functions.php of the website child theme. Its basic function is to get the price, format it, and change when a sale is currently running. To integrate it into an html page simply add [woocommerce_price id=”product_id”] to your body text and the correct data is populated on page load. [woocommerce_price id=”1754″] is the exact shortcode for the 001 Game Creator product.
/**
* Woocommerce price shortcode [woocommerce_price id=”99″]
*/
function so_30165014_price_shortcode_callback( $atts ) {
$atts = shortcode_atts( array( ‘id’ => null,
), $atts, ‘bartag’ );
$html = ”;
if( intval( $atts[‘id’] ) > 0 && function_exists( ‘wc_get_product’ ) ){
$_product = wc_get_product( $atts[‘id’] );
}
if( intval( $atts[‘id’] ) > 0 && function_exists( ‘wc_get_product’ ) && $_product-
>get_regular_price() > $_product->get_price() ){
$_product = wc_get_product( $atts[‘id’] );
$html = ‘
‘;
} else {
$_product = wc_get_product( $atts[‘id’] );
$html = ‘
‘;
}
return $html;
}
add_shortcode( ‘woocommerce_price’, ‘so_30165014_price_shortcode_callback’ );
Offline Wiki/Documentation
Generating the Offline Wiki
Download HTTrack from “https://www.httrack.com/”
Open HTTrack
Name Project Folder to “001 Wiki DD-MM-YY” click next.
On Web addresses page in HTTrack click “Add Url” Button and input “https://001gamecreator.com/wiki/” click okay and then next when back to the Web Adresses page.
Start the export and wait until finished.
Click Finish and then Exit HTTrack.
Delete the “blackblue.png”, “index.html”, “fade.png” and “project file name.whtt” outside of the project folder.
In the project folder (named “001 Wiki DD-MM-YY”) delete all folders and files EXCEPT for “001gamecreator.com”
In the “001gamecreator.com” folder delete “base” and “wp-includes” folders.
Open the “wp-content” folder delete the “plugins” and “themes folders.
In the folder ../001gamecreator.com->wiki
-Rename the “index.html” file NOT contained in a folder to “welcome.html”
-Delete all .html files not included in folders EXCEPT for the renamed “welcome.html” file
-Delete the “^{[^”, “_detail”, and the “ABCDE….” folder.
Rename all “index.html” files contained in folders “pagename” to containing folder name.
Move all files that have been renamed from the folders into the …001gamecreator.com/wiki/ folder. ALL page html files should be in the same folder.
(If doing manually use Bulk Rename Utility https://www.bulkrenameutility.co.uk/Main_Intro.php for the sake of ease)
1-Open HTML_Splitter.exe
2-Click the first text composite
3-Select the file that contains the style element you need to insert into page (Page CSS Styling included in the folder)
4-In the middle composite select the “Side Index” file. This contains all of the menu html.
5-On the bottom text composite mount the page html you want formatted
6-Click go and hit OK on the confirmation window
-After Running the Splitter-
Rename outputted file “pagename”_EXPORT.html to “pagename”.html
1.Find and Replace “/index” with “” on all html files in the “wiki” folder.
2.Find and Replace “../” with “” on all html files in the “wiki” folder.
3.Find and Replace ‘wp-content” with “../wp-content” on all html files in the “wiki” folder.
YOAST SEO
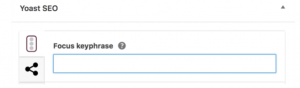
What is the focus keyword/keyphrase?
The focus keyword – or keyphrase – is the search term that you want your page to rank for most. So when people search for that phrase, they should find you. Yoast SEO it has its own input field for this. The plugin evaluates the page’s content and provides feedback on how to improve the content for that focus keyphrase.
Snippet
The snippet section is used to set the description of what the page is about. For example, the one currently used for 001
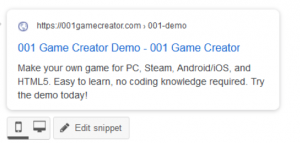
You can easily edit this description by pressing the “Edit Snippet” button at the bottom of the image shown.
*If any of this information is changed, any changes must be reported to admin staff. Any changes need to be reported to search engines via using the “scrape” submission form. Doing this reduces the time it takes for search engines to index the new information and update it in their database possibly months earlier than the normal interval performed.
Ideapush
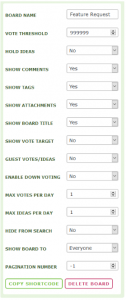
This is the current setting for the Feature Request Ideapush board. There is no need to change any of this. Located in Dashboard>Ideapush>Settings.
Options are self explanatory.
*Vote threshold denotes when an idea is automatically flipped in regards to its status. Since there is no “Unlimited” setting, simply putting an astronomically high number circumvents the status switch.
Custom Statuses
In the Settings page of Ideapush, you can change the default status messages by clicking on the “Statuses” tab.
Notifications
Notifications can be enabled/disabled in the notifications tab.
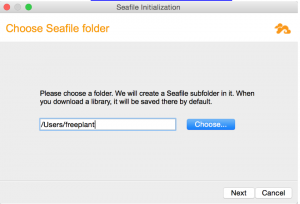
Seafile
1. Select a disk partition to store local Seafile data
Can be downloaded from https://www.seafile.com/en/download/
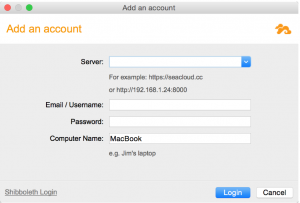
2. Add an account
Add an account on your private Seafile server or our public server.
Server Address: https://storage.softweir.ca:18092/
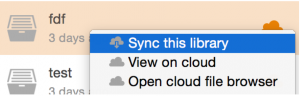
3. Sync a library
Click the “Sync this library” button to sync it with a local folder.
Then you add some files into the library. They will be automatically synced with cloud platform. This is perfect for sharing larger files or folders for tasks.
FileZilla FTP
The easiest to use and free software for use in changing any website data via FTP https://filezilla-project.org/
Connecting to the server
1. Host needs to be set to ftp.”sitename”.com (com can change depending on the domain)
2. Username is the designated username given by the site owner, access can be given through cpanel or any other host admin
2. Set Port to 21, this is the port used to connect through FTP
![]()
Click Quickconnect and if the Host, Username, and Port is set correctly you will connect to the server at your target website.
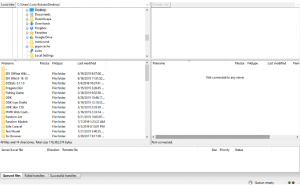
The left two composites are your files. If downloading from the wesbsite (on the right) the target path is the currently selected folder/location.
The right two composites, on connecting to the site, are populated with all pages, script files, images, etc from the website database. Right clicking brings up the context menu to perform actions. The top composite details the folder hierarchy, the bottom details the files contained in the selected folder.
EDU Install and Register
Installing 001 can be completed in a few quick and easy steps:
1. Download the 001 Game Creator client from your received order confirmation.
2. Either place the setup.exe in a shared folder with your network or transfer the setup.exe to the desired system.
3. Double click the setup in your downloads folder to run the install. (or the designated shared file)
-Windows may block the install process due to being an Unknown Publisher, this is normal and only happens on the first time installing in a pc. To bypess this click More info, then the Run Anyway button
4. Select your language and follow the instructions in the setp window.
5. After following the setup instructions and agreeing to the End User License Agreement. Choose your destination folder. By default 001 installs to C:\Program Files(x86)\001 Game Creator.
6. After installing has finished run 001 Game Creator.
7. Navigate to Help>Enter License Keys.
8. In this window you need to enter the Email used to purchase the program and the key provided in your Order Confirmation email.
9. Click “Ok” and 001 Game Creator is ready to use! Congratulations and we hope you have a wonderful time using 001!
Alternate method to register a product key:
Navigate to C:\ProgramData\001\SETTINGS.INI
The following is the syntax:
[License]
Email=example@example.com
-Paste License Key Here-
Save the .INI and 001 is now registered.